Remove Seat and loose items such as tool kit, etc. When proceeding, many different sizes and types of bolts will be removed. The photos below will help identify which ones comes from where but you may want to make separate notes to assist you when reassembling.
Remove Left and Right Side Covers
 |
| 1600 x 1200 |
Remove Seat Cowl Handles
 |
 |
| 1600 x 1200 | 1600 x 1200 |
Remove Seat Cowl
- Remove Top Screw
- Remove Side Screws
- Use a Drift Punch and Hammer to Remove Push-Pin Fasteners Underneath
- Pull Cowl Backwards over Tailights
 |
 |
 |
| 1600 x 1200 | 1600 x 1200 | 1600 x 1200 |
 |
 |
 |
| 1600 x 1200 | 1600 x 1200 | 1600 x 1200 |
Remove Battery
 |
 |
| 1600 x 1200 | 1600 x 1200 |
Remove Undertail Attachment Bolts under Side Covers
 |
 |
| 1600 x 1200 | 1600 x 1200 |
Remove Rear and Two Rear Side Attachment Bolts
 |
| 1600 x 1200 |
Remove Center Hold Down Phillips Screw
 |
| 1600 x 1200 |
Remove Rear Brake Fluid Cylinder Attachment Phillips Screw
 |
| 1600 x 1200 |
Detach Fan Motor and Starting Circuit Cutoff Relays Under Left Side Cover
 |
 |
| 1600 x 1200 | 1600 x 1200 |
Detach Yellow Box if Installed
 |
| 1600 x 1200 |
Detach Fuse Box
 |
| 1600 x 1200 |
Unscrew Ignitor Unit
 |
| 1600 x 1200 |
Unscrew Tip Over Sensor
 |
| 1600 x 1200 |
Detach Flasher Relay
 |
| 1600 x 1200 |
Detach Starter Relay
 |
| 1600 x 1200 |
Unhook Tail Light and Turn Signal Connectors
 |
| 1600 x 1200 |
Flex Undertail Around Seat Lock Assembly
 |
| 1600 x 1200 |
Pull Undertail Backwards Watching Cables and Remove
 |
 |
 |
 |
| 1200 x 1600 | 1600 x 1200 | 1600 x 1200 | 1600 x 1200 |
Remove The Following From Undertail Fender Assembly:
- Turn Signals
- Tailights
- Tailight Bracket
- Rear Reflector
 |
 |
 |
 |
| 1600 x 1200 | 1600 x 1200 | 1600 x 1200 | 1600 x 1200 |
Some Undertail Fender Pictures
 |
 |
 |
| 1600 x 1200 | 1600 x 1200 | 1600 x 1200 |
2. Trim the Stock Undertail:
Work slowly, take your time, and expect a huge mess. Remember, if you remove too much plastic you have ruined the undertail.
Stop frequently, check your work often on both sides of the undertail. Know what you are cutting and how much you are
cutting before you cut it. Ok, here it comes: "Measure Twice, Cut Once."
3. Fabricate the License Plate and Turn Signal Brackets:
The license brackets are made from 1 1/4" x 1 1/4" x .125" L-Bracket aluminum bar stock. A one foot length is enough
for all the brackets. The plans show slightly different thickness for the aluminum. I used .125" thick stock for all
three pieces. The plan shown below is only a guide.
When then brackets are finished, prior to painting, it is a good idea to temporarily attach the turn signal brackets
and the turn signals onto the license plate bracket using all screws, nuts, and washers to verify sufficient clearances and
hole sizes for position adjustment. See the section below on attaching the brackets and turn signals for how to do this.
Paint the pieces, first with a zinc primer, then satin black
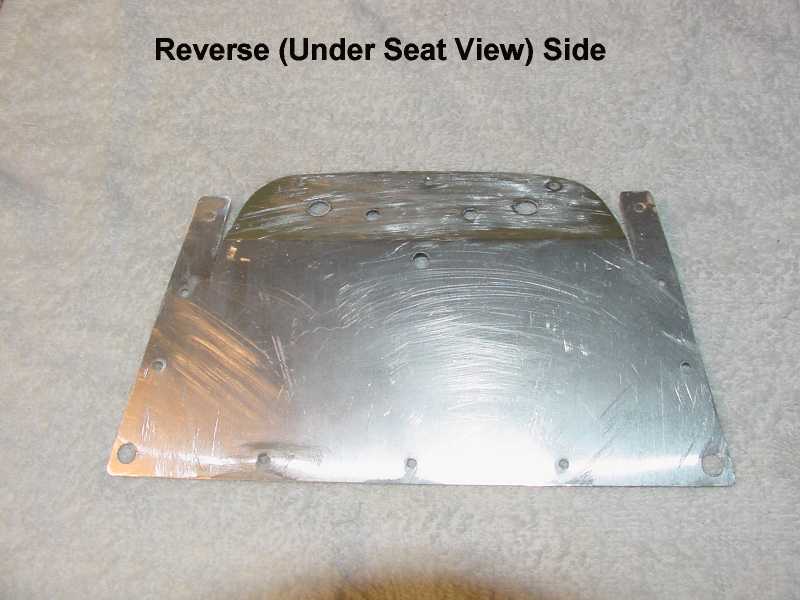
4. Fabricate the Undertail Plate:
The piece made must fit according to the manner in which the
undertail was trimmed. Hence actual measurements and sizes will vary. Start by making all sizes a bit larger than necessary
then trim down to fit. As with the undertail trimming, material can always be removed it can never be added.
The undertail piece is made from .025" sheet aluminum. The aluminum is easily cut with the straight edge cutter,
trimmed with a hacksaw blade, and filed to shape. Use primer on the aluminum before the satin black paint.
This is a more detailed version of the initial guide I used. Afterwards, the actual plate was hand worked and matched to
the trimmed undertail to verify the fit.
5. Trim the Ends of the Stock License Bracket:
Remove the stock license plate bracket using a 10 mm hex wrench.
The stock license bracket with its rounded edges is too wide and protrudes beyond the ends of the
license plate. This would also obscure the inside portion of the turn signals. The easy solution is simply
to trim the ends. You will probably damage the finish on the bracket with the cutting so you may have to paint it. I
used a primer coat first then satin black.
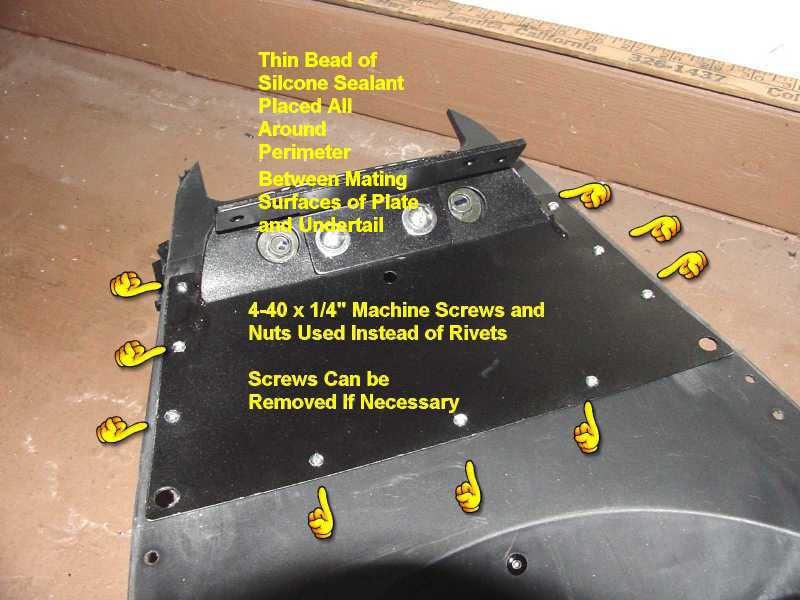
6. Install Undertail Plate, Brackets, and Turn Signals:
Do the following procedures in the order shown:
Drill Plate Mounting Holes
Reinstall Stock Tailight Attachment Bracket
Attach License Plate Bracket to Undertail Plate
Mount Plate in Place
Paint Metal Screw Tops Black
Attach Turn Signal Brackets
Attach Turn Signals
Attach License Plate Bracket
7. Reinstall Modified Undertail and Connect Turn Signals:
Reinstalling the undertail is much easier than removing it. Just reverse the removal procedure.
Then connect the new turn signals.
Lastly, mount the license plate to the modified bracket.
Some Pictures of Finished Installation:
After and Before Comparison Photos:
Update:
I upgraded the Lockhart-Phillips short stalks with LED units from Rizoma. These are really sharp looking and every bit
as bright, if not brighter, than the bulbs. The Tridon EP-37 constant rate flasher
works well with these and my front LED's to keep the flashing rate correct. Contact Mike Pijanka
at pjsparts.com for availability and pricing if
interested in these little jewels.
Last Updated: 08-16-2004
Copyright © 2001-04, Patrick Glenn, All Rights Reserved.
The information presented here reflects solely my personal experience with my motorcycle and is presented
for entertainment purposes only. No information presented here is to be relied upon for issues of rider safety
nor to replace the services of a qualified service technician.
Any attempts to follow or duplicate any of these procedures are done so completely at your own risk.
By reading the information on this site, you agree to assume complete responsibility for any and all actual
or consequential damages that may arise from any information presented herein.


1600 x 1200
1600 x 1200
1600 x 1200
1600 x 1200


1600 x 1200
1600 x 1200
1600 x 1200


1600 x 1200
1600 x 1200
1600 x 1200


1600 x 1200
1600 x 1200
1600 x 1200


1600 x 1200
1600 x 1200
1600 x 1200


1600 x 1200
1600 x 1200
1600 x 1200


1600 x 1200
1600 x 1200
1600 x 1200
1600 x 1200


1600 x 1200
1600 x 1200


1600 x 1200
1000 x 500
1600 x 1200


1600 x 1200
1600 x 1200


1600 x 1200
1600 x 1200
1600 x 1200


1600 x 1200
1600 x 1200


1600 x 1200
1600 x 1200
1600 x 1200


1600 x 1200
1600 x 1200
1600 x 1200

1600 x 1200

1600 x 1200

1600 x 1200


1600 x 1200
1600 x 1200
1600 x 1200


1600 x 1200
1600 x 1200


1600 x 1200
1600 x 1200
1600 x 1200
1600 x 1200


1600 x 1200
1600 x 1200


1540 x 1200
1600 x 700

1600 x 1200

Back to Main Page
Yamaha® and FZ1® are registered trademarks of the Yamaha Motor Corporation.
This site is not affiliated in any way with the Yamaha Motor Corporation.